Tuesday 26 June 2018

Fairy Garden No.2

This hot sunny weather is keeping me out of my craft room and into the garden!
Having seen my fairy garden and seeing how delighted the grandsons found it, my daughter asked me to make one for her home.  That is what I did this morning. I used an old garden pot and added a layer by inserting a smaller pot on top and a broken garlic pot on either side or the smaller pot.


I didn't have any more pottery houses so I bought some mini fairy houses from "The Works"  and painted them with acrylic paints and glitter. I stamped the sides with Stazon ink.
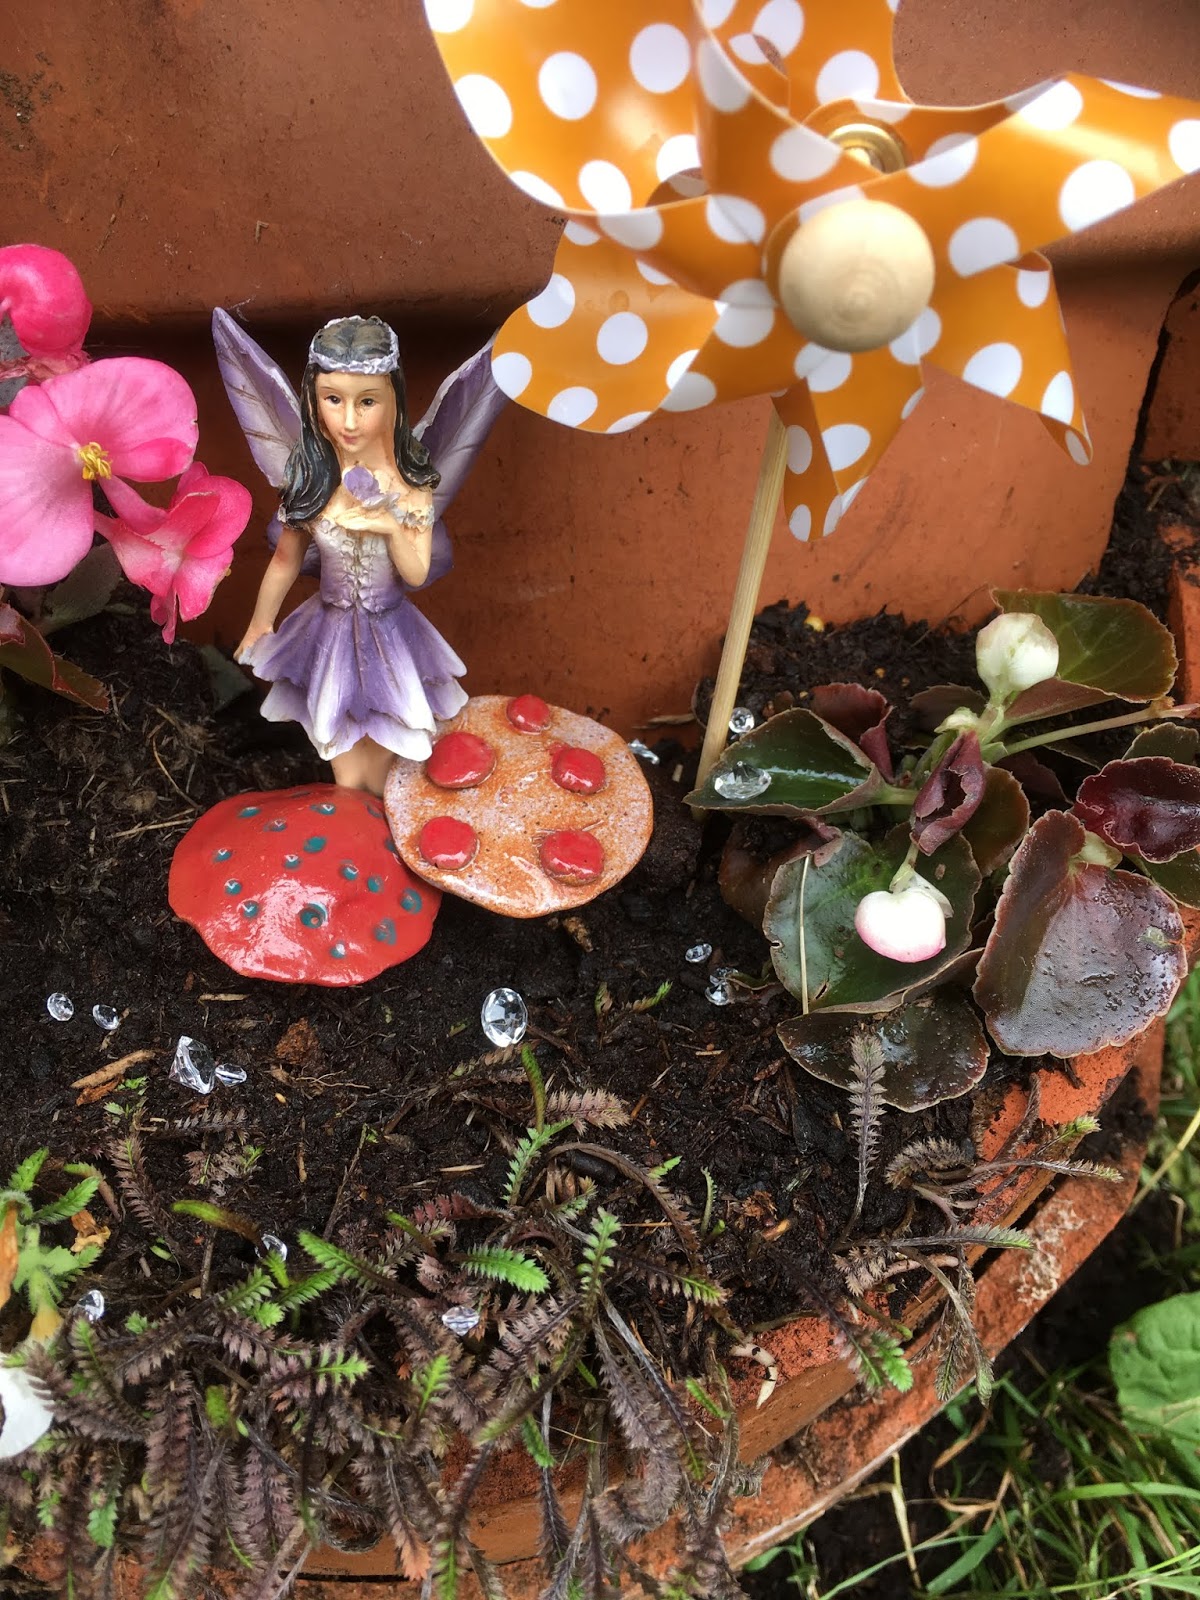
I found some air dry clay in one of my cupboards and made a few toadstools and  mushroom house and left them to dry for a few days before painting them.
I planted some star flowers and marigolds and some green plant( don't know its name!)
Finally I added  some white stones, picket fence, butterflies, windmills etc and added them  to finish the garden. We were lucky to find some solar powered butterfly lights in a local store, so I just hope they work in the dark.  The old gnome on the side was inherited  from my mother's garden. My daughter had painted it for her, when she stayed with my mother for a few months when she was in Uni, so it has special memories for her.

Finally we added magic by sprinkling sliver holographic sequins over the whole thing.
Now we just need to wait to see if the fairies will move in............. That magic buying site eBay told me they might arrive in a few days 😉
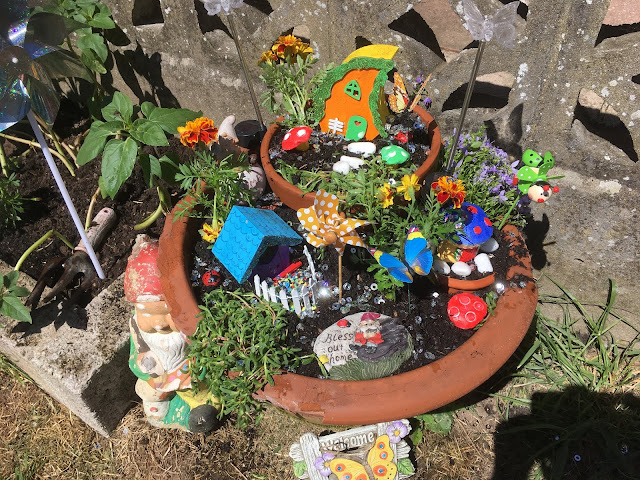
Saturday 16 June 2018

Fairy garden

This is not a paper crafting project for a change. I did make many of the elements in this project but used a different medium. I have 3 grandchildren and I wanted to make something interesting for them in the garden. What better than a fairy garden?

 I had started working on it,  in pottery classes, about 18 months ago. I made two fairy houses, some toadstools and a table and stools.  That's as far as I got.

I already have a few broken garden pots that I  used up as a form of decoration/ animal home. It looked  as if the pots were half buried.   I have had a robin nest inside one in the past but it hasn't been used in the last few years. That part of the garden has been taken over by ivy and the pot was almost invisible and I had almost forgotten about it.
Someone posted a photo, of a fairy garden, on a friend's Facebook timeline and that reminded me of the items I already had to make one and it spurred me on to get this finished before the grandchildren become too old to enjoy it.

Yesterday, I went shopping with my daughter and bought a few items like mini windmills, clear gems, metal flower and mini solar powered lights etc. They were very cheap because it was a shop where most things costs a pound. I think I spent £5. I also bought a tray of begonias and two alpine plants from a local nursery then picked out a couple of small plants already in my garden e.g thyme.

I came home and immediately set to work........... I rescued the broken flower pots and  pieces and placed it in the bottom corner of my decking, below some steps.  Its in a sheltered by sunny spot. I filled it with compost placing the pieces in a way that retained the soil. I positioned the pottery pieces and kept rearranging them until I was happy with the layout. I then planted the begonias and alpine plants and then added everything else.The windmills give some movement in the breeze whilst the mini solar lights change colour and add interest in the dark.

 I will have to add more plants as and when I find suitable perennial ones to replace the begonias when they die off in the autumn. I am waiting for a mini picket fence and some butterflies, that I ordered online, to arrive but I'll only add them if they look ok.
I am pleased to have finally finished the garden at this stage. It'll be interesting to see how the plants develop and change the look of the garden.

My last job will be to tidy up the surrounding grass or place a slab under the pot to make it look presentable.
I hope the grandchildren will like it!

Thursday 14 June 2018

Background-less card tutorial

 
I've had a few people question me about how I make the background-less cards that I showed in a recent post so I decided to make a video on how I did them. The video shows how to make a basic card with added  simple embellishments. t I can't see why you It looks complicated but it is relatively simple to create. I have used the Silhouette Studio software to design this card but I would imagine you could use any program that allows you to add shapes and text and be able to weld the shapes together.
You can create cards for all occasions using this method so  have a go.


I'm a beginner when it comes to creating and posting videos.    So, please bear with me and let me know if you have any difficulty watching the video. If you have any questions  please feel free to ask them in the comments section below. and I'll do my best to answer them.


 Once you've welded your text to the frame your choices, of what you add next, are numerous.  You could add swirls, hearts flowers, cars, tools, kiddie themes or shapes etc. Shapes and swirls can be welded to the frame without necessarily having to add an image on top.  You could then decorate the card with gems,  ribbons etc. The type of card used also contributes to the look of the card, anniversary cards look lovely in glitter card in the colour of specific anniversaries also add to the look of the card e.g red glitter/ mirri card for  ruby weddings  as shown on the anniversary cards in an earlier post.  3D  flowers or embellishments can also be used to enhance your project. The choices are only limited by your imagination!

This card is personalised with a specific name but if you think you can find a use for it  download the camper van card HERE. As usual the free zip file contains .studio and .svg formats and the van image. This is for personal use only.

P.S there was a glitch with the files but the links have now been updated so should now work correctly. Sorry for any inconvenience.  Unfortunately gardening tasks took longer then expected so I I haven't had time to make the card. I will complete it and post a picture soon.

PPS. As promised here are the photos of the finished project. I used plain blue card that was blended with faded jeans distress oxides and spritzed with water I duplicated one camper van and enlarged it. Print and cut all the elements and adhered them to the card. The large camper van was stamped with a greeting and attached by fine thread. Phew finally finished it!


Saturday 9 June 2018

Cards for him

More cards with the hollow theme.
These are more general male cards designed and cut using the Silhouette Studio and my Cameo 3.
The first one is a rugby card. Like the anniversary cards I simply made a rectangle, added an internal inset and made compound path. I added the text and again welded them all once I was happy with their position. I then welded the images.
 As well as welding the rugby players to the card I cut them out separately and adhered them on top of the welded figure to add dimension and a change of colour. I would cut it out in the colours of the team the recipient  supports. 
 I duplicated the page and  flipped horizontally and then welded to the other piece to create the card back.


I also made another card using the same technique but this time adding a Ferrari type car front. Again I cut out separate pieces to adhere to the card after cutting out. I didn't add an extra piece to the back of the card as I felt it didn't need it.

You can download these files HERE. The zip files are in .svg and .studio format and are for personal use only.


If you attempt to make your own bear in mind the cards feel more special if you can add the recipients name to the text section.


Wednesday 6 June 2018

Whisper I love you to a Butterfly

Again I've been playing with my Cameo software. I saw something similar in Pinterest so decided to have a go at making my own.

This is a simple design that can either be print and cut and adhered to some card or MDF etc or cut out of vinyl and adhered to some wooden pieces to create a lovely wall hanging.
I simply made 5 rectangles and lined them  above each other. I filled with a wood effect colour and added a shadow to give dimension.
You'll  find the shadow tools on this icon on the right hand side of the work space. The menu allows to you choose the position and colour of the shadow.


Next I added some text. I used the free Lavanderia font to type out the words. You can click on the font name to find the free download site. I then welded the font and placed the words on top of each section and grouped it all together.

I finally added some Marianne butterfly dies to decorate the wall hanging. I cut a butterfly from black card and  Marianne dies with my Bigshot, I then scanned it into my computer and traced it in the software so that I could adjust the size of the butterflies. I coloured them using the fill tool in the software.
Yu can download the cutting file HERE. The zip file contains .studio and .svg formats

Tuesday 5 June 2018

anniversary card

This evening I've just been playing with the Silhouette Software that comes with Silhouette cutting machines ( My Cameo 3).
Someone on Facebook was asking for ideas for an anniversary card so I decided to make a general type using a style I've used before and pleased the recipients by personalising them with the couple's names.  They like the fact that the design is not run of the mill making them special. They have been described, by friends, as lovely keepsakes which I found very touching. The red ones, below,  are samples of personalised ones I've made.
 I no longer have the originals to show you but the picture of the design gives you an idea of what they look like.  impresses people is the fact that you can see right through the card except for the lettering. The white parts of the cards in the picture are open spaces. The back of the card is the reverse of the front so when folded just shows the words and patterns as you can see in the orange photo below. I cut them out using red mirri or glitter card and add gems depending on the anniversary e.g red for 40th gold for golden etc. The very 1st one I made was for a diamond wedding so used white glitter card and clear gems.

This orange one is the general one I designed tonight and done in the same way as the personalised ones. I would cut it out using gold coloured card - mirri or glitter.
They look quite complicated but are simply text welded to a frame and also a welded heart or swirl
How do you add a sentiment I hear you ask?
 I cut out a blank heart and  layer with the same pattern included in the design and tie it to the card so it dangles from the card and is large enough to write a short sentence and signature.  I have also used just the front section and adhered it to a card base. This also looks lovely but, in my opinion, is not as dramatic as the see through ones.
This design is also great for birthdays or any occasion.
You are welcome to download the general card HERE. The files are in .studio and .svg formats and are for personal use only.