Wednesday, 30 May 2018

craft o clock


The clock in my craft room does not work so rather buy a new one I decided to make one.   I based my  design and used some of the files from the "silhouette school" website where Mellisa  offered a free cutting file for the cover. I made a couple of changes to the original design e.g change to the orientation of the wording. Mellisa painted a clock face and created the rest with vinyl.  I chose to take the easy road and used print and cut to cut out the design using my Cameo 3.  I realised, after I'd printed the clock face out, it would have looked better if I had selected to print the lines to give a cleaner image. My printer ink is low so I didn't want to print out the clock face again. The clock will only be  in my craft room and I can live with it as it is.


Initially I tried to make the clock using cardboard/chipboard but found the card warped. So instead I bought two  25 cm MDF circles with holes cut out of the centre so the base would be a lot more solid. I bought two in case so I had a spare. I  ran  a black Promarker around the edge of the paper clock to get rid of the white paper. I also coloured the edge of the MDF board with the Promarker.  The marker ran out half way around so I finished it off with an old black Archival ink pad.
Once the ink was dry I simply coated the MDF with Matte Medium and adhered the clock face to the board.  Having learned from my attempt using cardboard I used only a thin layer of glue  to ensure the paper didn't bubble or crease. I also coated the top of the paper with a thin layer of matte medium to make the face more durable. Once dry it gave a lovely matte finish. If I'd wanted a more shiny effect I would have  added more coats of medium or used something like Mod Podge.
Once it was all dry it was time to assemble the clock to the mechanism. i bought the mechanism from Amazon. Unfortunately when it arrived I realised the hands were a bit small but decided to go with them as they didn't obscure the pictures on the clock face. I pushed the mechanism base through the hole in the centre of the clock and secured it with the accompanying nut. I then pressed the hour, minute and finally second hands on to the spindle.

 I added the battery and it worked! I was so pleased with it I made another clock for the other end of my craft room using my own design with more general craft tools. Excuse the whining noise on the video, my printer decided to reset itself have way through recording ..........

You can download my own file HERE. The files are in .studio and .svg format.

Thursday, 24 May 2018

Art Journal Hummingbirds

Its been over a year since I've done any art journaling so it was lovely to get stuck into my paints and inks again.
I took inspiration from one of the cards I made a couple of weeks ago  using Lavinia stamps. I coated the pages with Gesso and used blush and green acrylic paint to create the background colour. I used coloured Stazon inks (green and orange) and plant stamps to create the bottom half of the pages. I used a Paper artsy dots stamps and script stamp from my stash to add texture to the top half of the pages. I downloaded and printed off the humming birds from Dreamtime Images and cut them out. cut out a heart and stamped it to create a pattern. I adhered the images to the pages. I added some cotton to attach the heart to the hummingbird's beak. I then used my Faber Castell pens to add shadow and colour the quotes. The quotes are Stamps by Chloe. I've had them several years so I'm not sure if they are still available. I stamped the saying on copy paper stuck the on with matte medium. Finally I edged the pages with orange pen.
 It's a simple page to get me started again. 

Tuesday, 22 May 2018

Brusho v Infusions

I recently went to a stamping workshop where we used paint crystals called "Brusho'  by Colourcraft for the first time. As I used it I had a vague suspicion I'd used them before. I liked them very much so, when I got home, I ordered a set. I was gluing my perpetual calendar on my painting table when I noticed a box under a shelf, as soon as I got it out I realised why Brusho seemed familiar. They were a similar product I 'd forgotten I already had, these were called 'Infusions"by Paper Artsy.
I thought it'd be a good opportunity to compare the products.

I looked for colours that were very close to each other to make it easy to compare. The picrue shows the comparison.

Both sprinkled onto wet paper easily and distributed well across the paper. I found that both makes spread nicely when spritzed with water. The Infusions needed more water than Brusho to spread colour. The  Infusions took longer to dissolve with a few crystals not dissolving at al maintaining the speckled effect where the Brusho spread to cover the area.  The Brusho colours tended to be much brighter than the Infusions. Infusions tended to be more earthy in their theme of colours with speckles of brown and black in most colours where as the Brusho tended to add more oranges and yellows to their lighter colours. Their darker colours like black were a mixture of blues, reds and black where the Infusions was a true black.
Which one do I prefer ... I think for a more speckled earthy effect I would use the Infusions but for a brighter and more coverage I would use the Brusho.

This is my first attempt at using Brusho with a stamp. The image is from a Crafters Companion Echinacea negative stamp. I stamped it with Versemark and heat embossed with WOW white embossing powder. I then spritzed with water and sprinkled black Brusho. I wiped the excess off the embossed area with some wet wipes.

Sunday, 20 May 2018

Blippi Card

Its my youngest grandson's  3rd birthday next month so I thought I'd get a head start and make his card. He's a keen fan of Blippi who is a YouTube character who shows children around play areas in the USA. He also shows them different vehicles like bulldozers, police cars, etc. Every time my grandson comes to visit me we have to watch him on Youtube.


Its a very simple and easy card to make. It's made up to look like Blippi's shirt, bowtie, glasses and braces. I made a gatefold base from blue card then cut out the elements using my Cameo 3and adhered them to the front.
Inside the card I adhered a cartoon image of Blippi with a speech bubble  saying Happy Birthday. I used the Print and Cut option on my Cameo to cut out the figure. I've ordered a Blippi related present which I'm sure he'll love.
I feel there is something missing from the card front but I'm not sure what to put there. If you have any ideas, feel free to offer your suggestions ........... please :-)
EDIT:
I finally finished the card by adding a large number 3 on the left hand corner. 

Thursday, 17 May 2018

Perpetual Calendar (Part 2)

I managed to finish my calendar today.
How did I finish it? Once the tags were all decorated I used my Cinch (WRMK) to punch holes in each one.
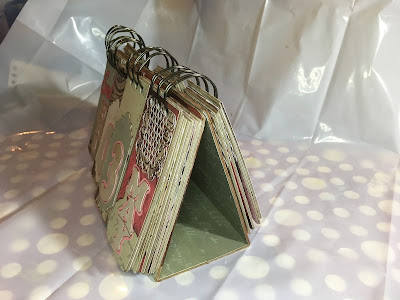
I then turned my attention to the base. I lined up the three pieces and adhered some Tyvak to join the pieces together. I thought the Tyvak would strengthen the edges where the base folds to create the sides. Some tutorials, online, make the base from one piece of chipboard that is scored but I felt I'd get a sharper fold at the base by using separate pieces that gives a cleaner edge.
Next, I covered the whole base with coordinating paper from the same pack. Although the paper is a lovely quality it doesn't like being folded and has a tendency to crack. The folds on the inside cracked but it didn't matter because once folded into a valley fold you couldn't see it. I was pleased that the paper on outside of the base didn't crack. Unfortunately I was so engrossed in what I was doing I forgot to take a photo! It wasn't exciting just patterned paper covering both sided of the base. I gave the whole base a coat of Mod Podge, just like the tags, to make it more durable.
Finally it was time to assemble all the pieces together. I used my WRMK Cinch to punch holes in all the tags and the base. I did try it out on some spare card to make sure the holes were placed centrally on each tag.
I then cut and fed the wire through the holes lining each group of tags along side each other.
I did find it difficult to use the machine to close the wires because of the shape of the base and thickness of all the tags. The wires were not staying in shape.  In the end I just squeezed them closed with my hands.


The whole project took me about 3 afternoons/evenings to complete I got a great sense of achievement finishing it. It's been a long time  since I made anything like this.
Yes I do know it's not Friday the 3rd May, its the 4th today, I was just flipping the tags to take a photo.... well that's my excuse anyway!!

You can download the cutting file for this calendar HERE . The files are in .studio and .svg format.


Wednesday, 16 May 2018

Perpetual calendar ( part 1)

I'm not a major card maker, If I'm honest I prefer scrapbooking and other paper craft project. My latest project has been inspired by  a "We Are Memory Keepers" blog in 2014. WRMK was selling a kit to make the calendar but I figured it would be easy to make with my own stash.
I need a calendar for my desk and thought this would last me years so that's what I'm making.

My first step was to cut out 33 pieces of 2 x 5 inch rectangle from  chipboard. I used chipboard for sturdiness but cardboard would do just as well. It sounds a lot of rectangle but you need 12 for the months, 7 for the days  2 sets ( 0-3) (0-9) of numbers for the date. I rounded the bottom 2 corners with my WRMK corner punch.

I also cut out two covers measuring 5½ x 8 ½ inches and one piece 8½ x 2 inch for the base and rounded the corners here too.

Next I had to choose what papers to use. I chose a paper pad I bought in a local shop called "The Works". It was by Make and Create. I've only seen this paper make in The Works, they are very inexpensive but the quality of the paper is excellent. I only used the one pad so that all  my papers would coordinate.

 I cut out 66 pieces of  2 x 5 from the  paper and adhered them to both sides of each rectangle. I used Mod Podge to stick them down.
 Once my rectangles were covered I organised them into  piles deciding which ones I wanted for each section of the calendar e.g days, months etc. I also decided which would be the front and back of the  rectangles. I decided to use the same pattern for the front of each group to make it easier to organise. I stuck "Post It" notes on each pile to remind me to which  group they belonged. It didn't matter what was on the back of the rectangles because they would not be decorated except the Months. I chose a plainer paper for the back of this group so that I could write down birthdays on the back of any specific month.

Next, I went  to my Cameo machine and cut out the numbers, words  and embellishments that would be adhered to the front of the rectangles.Thank goodness for this machine otherwise it would have taken forever to get all that done!  I realised my numbers and words didn't stand out against the background so I offset some pink paper and matted and layered everything onto the card.  Next I edged them all with brown  Staedler fine markers to help them pop out of the rectangles.

 I did this part of the project over 2 afternoon. Adding all the layers was quite time consuming so I had regular coffee breaks to ease my stiff neck!
The rest will be completed in part 2.  The free cutting file for this project will also be in part 2 so keep watching!

Sunday, 13 May 2018

Scrapbooking part 2

I've made one scrapbook page for  the eldest grandson so now its time to do another page for the other grandsons.  They both love dressing up and they look so cute especially the youngest in an outfit that's just a bit too big for him. Like the previous page I have used embellishments from the "misskatescuttables"website.
 Again I used a paper from my stash, then downloaded, printed and cut the embellishments. I used my Cameo 3 to insert their photos into the different shapes and used the offset option to create a matching mat to place underneath. The rest was simply positioned and adhered to the page. A quick and easy page which looks a lot of fun.

Saturday, 12 May 2018

Time to scrapbook Part 1

How lovely its been to spend the afternoon creating a scrapbook page to record my grandson learning to swim with his Dad. He just loves to wear his goggles so naturally that had to be the title for the page.
The paper I used is from my stash and I don't know the make. I'm trying my best to use up  my stash before I buy any new stuff. The embellishments I downloaded, printed and cut from "MissKatesCuttables" website. This site is well worth a visit because it has a wide range of cutting files and printable things. She also has a lot of free files too.

I cut out the letters and the matting using my Cameo 3 and  layered the two make it pop. I matted the photo and adhered it to the page. The googles and frog are clipart images,  I inserted grandson's photos into the "lens" of the goggles to add interest. Finally I added the "at the pool to complete the page.
I will add my journaling to the back of the page, doing it this way means I can add what I like to the front without worrying about placing something to write on.
Next I'l be doing a page for my other grandsons........ any guesses  on what it will be about??

Monday, 7 May 2018

Note Book

Last Saturday I went to my local craft group monthly crop. What a fun time we had. One of the very talented members kindly offered to do a workshop on creating a note book. What was mind blowing was the unusual material she used to make the cover. What was it you may ask? It was washable wallpaper lining that looked and felt like soft leather once we had processed it. Its a waterproof paper that doesn't rip and is pretty tough. Decorators use it to cover cracked walls. The brand we used was called "Wall Doctor"  It always amazes me how people have the imagination to try using unusual materials and products to create such lovely things.

 How did we do it?
1 We took the flat paper and scrunched it up and kept opening and scrunching and scrunching ans scrunching  until the paper was well crumpled and had softened! I have to say my hands ached by the time this process was over!

 2, We then washed the paper in soapy water and rinsed it clean and allowed it to dry slightly.

3. We coloured the paper using diluted acrylic paints and sprays. You do need a lot of paint because it really soaked into the paper. For some reason most of the colours I used disappeared into the material and it became a pale cinnamon colour with some gold splodges. I like it though.  The paper was left to thoroughly dry.

4. Whilst the cover fabric was drying we turned our attention to the book pages. The pages were ea and coffee coloured copy paper. We cut the A4 paper in half and folded each piece in half and inserted inside each page to create the booklet/signature. I stamped a couple of pages  to add some interest inside the book.5. Once the cover fabric was thoroughly dry we trimmed it and the copy paper to size and placed the booklet inside the cover. We fixed the signature to the cover with needle and thread. 

We decorated the finished book in anyway we wanted. I used beads,charm, a mirri card butterfly and some pearls.

I think this  book cover would look fabulous as a cover for a mixed media art journal. Its strength would also make it great  to strengthen folds/hinges when making mini albums...... the possibilities are endless!
Thank you so much Beryl at Crafters Cwtch, Magor for your marvelous workshop!


Friday, 4 May 2018

How to make a Stamping tool

Stamping tools are all the rage at the moment. They have revolutionised people's stamping skills.  Great as they are they can be very expensive to buy. However I have been able to make my own at a fraction of the cost of branded ones. Mine allows you to stamp up to A4 size.
How did I make mine?
First I bought a hinged front opening picture from IKEA. The frame is called "Hemmingsbo" at the cost of £3.50.

I removed the wrapping and then removed the fixings on the back of the frame being careful not to damage the back too much.

Next I opened the front of the frame and adhered  some magnetic sheets to the  base of the frame. I didn't have an A4 sheet so I used two A5 sheets stuck along side each other. I was lucky because they were self adhesive sheets making it easy to put in place They are the magnetic sheets that crafters use to store their cutting dies. I don't have the make because its been in my stash a long time. I don't think it cost me more than  about £1 for the 2 sheets
 I then downloaded, printed  and laminated ½ inch graph paper. I downloaded it free from this site. Choose your own style graph paper that suits you. This laminated paper was adhered on top of the magnetic sheets. This  just provides some guides and protects the stamping area. That basically completes your stamping tool.
How to use this tool?
Open the frame. Place the paper, you want to stamp, on top of your graph paper. Secure it either with magnets or masking tape. Position your stamp where you want the image to appear on your paper. Close the lid so that the stamp transfers to the clear lid. Ink your stamp then close the lid and gently press the stamp so that the ink transfers to the paper. If the image doesn't stamp completely simply re-ink it and stamp again. Because neither the paper nor stamp changes position you can accurately stamp over the image as many times as you like or until you get as good an image that suits you.  The clear cover on the lid is perfectly usable but I have bought a slightly thicker  1.5mm perspex sheet to replace it just so its a little more sturdy. I adhered it to the frame with some strong glue. I bought the perspex on ebay for about £3. The whole stamping tool  has cost me about £8 in total. To buy a branded stamping tool would cost between £25 - £40.  I do have a WRMK tool but in all honesty if I am stamping my go to tool is my home made one because I can stamp anywhere on my paper A4 Card where I can't on the other one.


Unfortunately today, I used a brand new  stamp to demonstrate the tool stamp but there were issues with it and it is clearly faulty. Not to be deterred I tried another stamp with greater success. I deliberately did not ink my stamp well at first.

As you can see, some details are missing from the first attempt on the left but stamping again, using the tool, I was able to get a clean crisp image. because the stamp and paper are fixed in place as shown on the right.  This stamp is from  the Art Impressions "girlfriends" collection. Its one of my favourites. I used it to try out the water colour markers and some permanent markers. The picture below has been coloured using Promarkers. The words were written using my Cameo and pens. I matted it on patterned paper from my stash and added ribbon and gems.  Now I can stamp more successfully I'm looking forward to doing more colouring. Me future goal is to use my markers more often and learn how to use them to shade properly.........


Thursday, 3 May 2018

Twist and pop up card

Now for something a little more complicated. Actually it looks more difficult than is.   I haven't included a front sentiment because I haven't decided if its going to be a birthday or other occasion card.

 The inside opens up to reveal the pop up panel situated across the middle of the card as shown on the right hand photo


 The construction consists of 3 pieces of cardstock. The base card, a centre strip to pop up and mechanism. The mechanism section as shown here on the left and right hand of this post. The mechanism is scored across the centre strip and then across the the centre of the piece to create a cross. The side panels and folded into the centre to fold the whole piece to look like the right hand photo.

The centre strip is a simple rectangle scored to create 4 panels with 2 valley and 1 mountain fold. This makes up the pop up section.

The  panel ends are adhered to the middle flaps of the mechanism, one panel on the top half of the right hand strip and the other on the bottom left of the opposite strip.  The pieces can be decorated with patterned paper prior to assembling the whole card. Finally I lined up and adhered the mechanism to the card base.

A really good website giving more detailed instructions with measurements can be found HERE 


 I have created a template cutting file for this card to ensure measurements are consistent and accurate.The template include all measurements. It just means I don't have to measure and cut every time I want to make this style of card. This time I chose not to use the machine to create the score line. Instead I used my bone folder and score board. I thought the fold lines might be stronger  that way. You can download the zip file  for the template HERE. The file is in studio, svg and pvgc formats.


BLOOPERS! 
This is why I found this card a bit of a challenge. It all worked out well on the prototype so I went ahead and made the actual card using my patterned paper.

Mistake 1.  I made, was to  adhere the patterned paper upside down on to top section of the mechanism so the planes, trains etc were the wrong way up. Never mind, I thought, it will still work OK.
Mistake 2. I  stamped the transport, compass etc a onto card and adhered them to each panel strip and edged with Distress Ink ( Pine Needles). I then added the panels to the mechanism. Blow me down if I didn't make the same mistake again and found the panels were upside down. I pulled the panel off without doing too much damage and corrected my error. Phew! it looked OK.
Mistake 3. I didn't line up the mechanism close enough to the centre fold of the base card prior to sticking the pieces together hence the card would not completely open. By this time I'd lost the will to live! However not prepared to be beaten I made the card again, this time it worked perfectly! Yay!

 This is the other twist and pop up card I've made. The stamp is Stampin Up "Beautiful You Dancing Girl" I cut the lettering  with my Cameo 3 machine. I then heat embossed it with Holographic embossing powder. I finished off with pearls on the front cover.


Tuesday, 1 May 2018

Decoupage

I have three young grandsons and even though they live very close to me they often have sleep overs. The spare bedroom is gradually being transferred into a proper boys room. Hubby bought some letters, from Hobbycraft,  to make up their names to decorate their bedroom.  The Capital letters are made out of MDF and the lower case ones from paper mache.

 I decoupaged them with tissue. I bought the tissues from various places from online and local craft shops. I started to adhere the tissue using PVA glue, but because it hadn't been used for ages the glue had become lumpy so I finished  some of the letters using Mod Podge instead. To be honest I think the Mod Podge gave a better finish.
It was an easy task cutting up the tissue and gluing them onto the letters. However,  because of suffering from winter bugs and the upheaval of builders replacing our roof it took me weeks to complete   I'm just glad the grandsons didn't have really long names hahaha!

Now I have to work out where and how best to fix them to the walls.  The grandsons are all at that stage where if I place them too low they'll mess about with them and break them so they need to be high enough to be out of their way but not too high to look weird. Hmmm decisions decisions.......